
Using the Alerts page with a product
This section contains information about these alerts features:
●
“To configure Alerts” on page 21
●
“To delete destinations and destination lists” on page 23
To configure Alerts
With a permanent storage device installed, you can set up four different lists, with up to 20
recipients on each of the four lists. Without a hard disk, you have room for only two e-mail
addresses.
1
If you do not have a permanent storage device, type up to two e-mail addresses. Click Apply
and continue to step 2.
-Or-
If you do have a permanent storage device, complete the following steps to change the
e-mail list name and add e-mail addresses.
a. Click Edit next to the list that you want to add to or modify.
b. Type an e-mail address for people who you want to receive alerts, and then click Add. In
large environments, system administrators can route e-mail addresses to list servers or
universal resource locators (URLs) for expanded alerts. You can add one destination at a
time and up to 20 total destinations.
c. For the List Name, type a name, such as Service or Supplies, and then click Apply.
d. Repeat step c to add additional recipient addresses. When you have finished adding
recipients, click Back to return to the Alerts page.
After you set up the destination lists, you can further refine the event alerts by selecting
specific details and options within each event. Continue with the following steps to refine
event alerts.
22 Configuring the Product from the Settings Pages
ENWW
2
Do one of the following:
• Select the check box for an alert category, and then click Apply to save your changes.
When you select a check box for an alert category, you automatically select all of the
individual alerts that are associated with that event category. Continue to step 4.
-Or-
• Click an alert category (such as Supplies or Service) to view the individual alerts that are
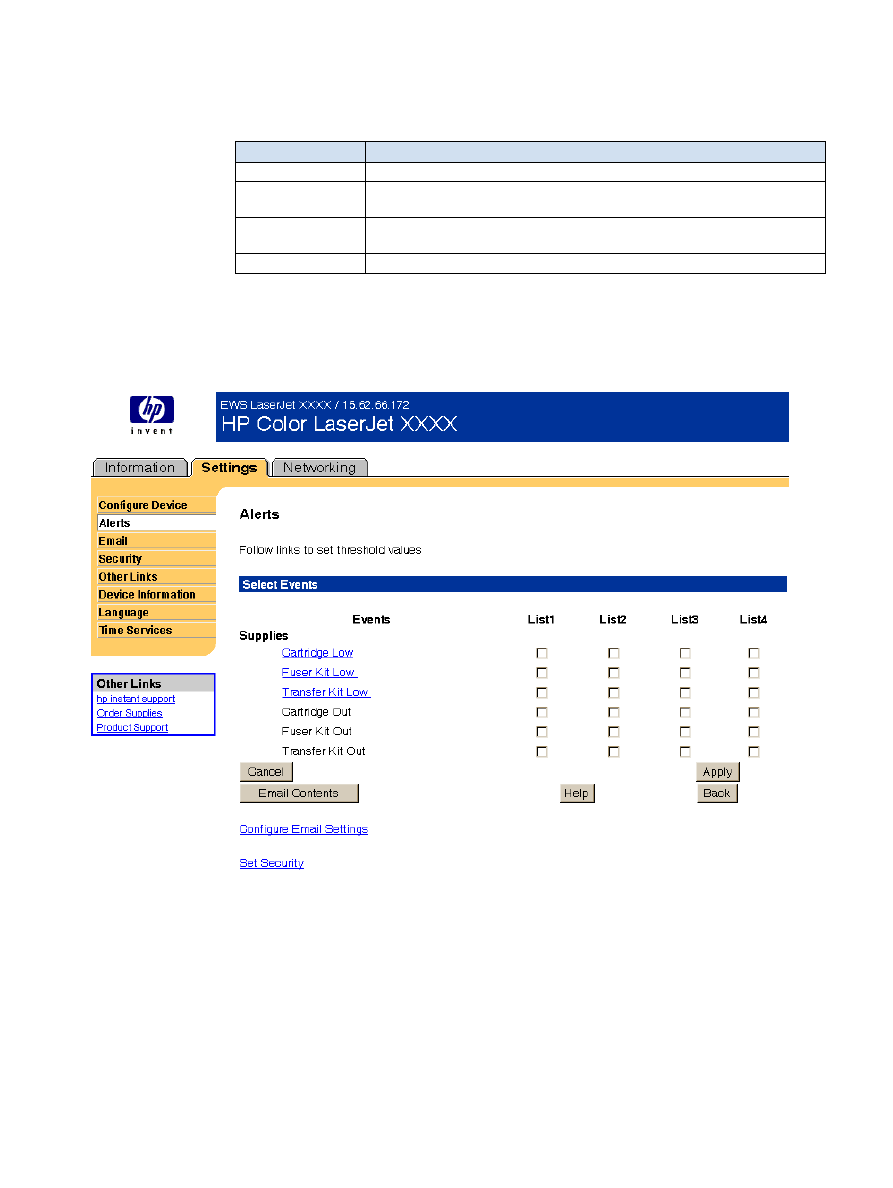
available for that event. Select the individual alerts for each destination list. The following
example shows the Supplies Individual Alerts for an HP color LaserJet product.
Alert category
Description
Supplies
Select specific supplies alerts, such as Cartridge Low or Fuser Kit Low.
Service
Select specific events that require service, such as “Printer Error” or “Duplex
Error, Check Duplexer”.
Media Path
Select events that are associated with the paper path, such as removing a
jam or loading a tray.
Advisory
Select advisory events such as “Page too complex” or “Insufficient Memory”.

ENWW
Alerts 23
3
Click any individual alerts that are hyperlinks (underlined with blue) to set a threshold value.
Set the threshold value for the individual event, and then click OK or Apply.
The threshold value for Supplies is a percentage, 0 percent through 20 percent, that
represents the amount of supply that remains. For example, if you set the threshold value for
the “Cartridge Low (Order)” alert at 15 percent, the product sends you an e-mail alert
message when 15 percent of the print-cartridge life remains.
The threshold value for service and for the paper path is a user-specified number of minutes.
This is the amount of time that an event will be ignored before an e-mail alert message is
sent. For example, you might want to set the threshold value for the “Tray Open” alert to 10
minutes to allow someone to close the tray after loading the tray or clearing a jam.
4
Click Email Contents to select the information that you want to be included with your e-mail
alert messages, such as supplies and usage information. You can configure the e-mail
contents differently for each alert category.
Note
For some products, the list of available attachments that can be included as part of all e-mail
alerts messages is available by clicking the Choose Attachments button, which is located on
the main Alerts page.
For these products, the selected attachments are used for all destinations or destination lists.
5
Click Apply to save the information, and then click Back twice to return to the main Alerts
page.
6
Repeat steps 1 through 5 for each additional list.
To delete destinations and destination lists
●
You must delete all of the destination e-mails in a list in order to delete the list.